HPC Orientation for Biologists
-
Prerequisites
- RCAC cluster account (apply here)
- Computer with internent connection
- Programs: A web browser (for Open OnDemand and Globus), Terminal/Putty/PowerShell
-
What you will learn
- Connect to any RCAC cluster via OOD, SSH, or ThinLinc
- Find and load bioinformatics software
- Submit interactive and batch jobs with SLURM
- Understand storage tiers and monitor usage
- Transfer data with Globus and rsync
This guide covers the day-one essentials for biologists using RCAC clusters. It uses Gautschi as the example cluster throughout, but the same patterns apply to Negishi, Bell, and Gilbreth. Just swap the cluster name in URLs and paths.
By the end, you will be able to log in, load software, submit a job, check your storage, and move data to and from the cluster.
How an HPC cluster works
An HPC cluster is not a single computer. It is a collection of networked machines that work together, managed by a job scheduler. Here is the typical workflow:
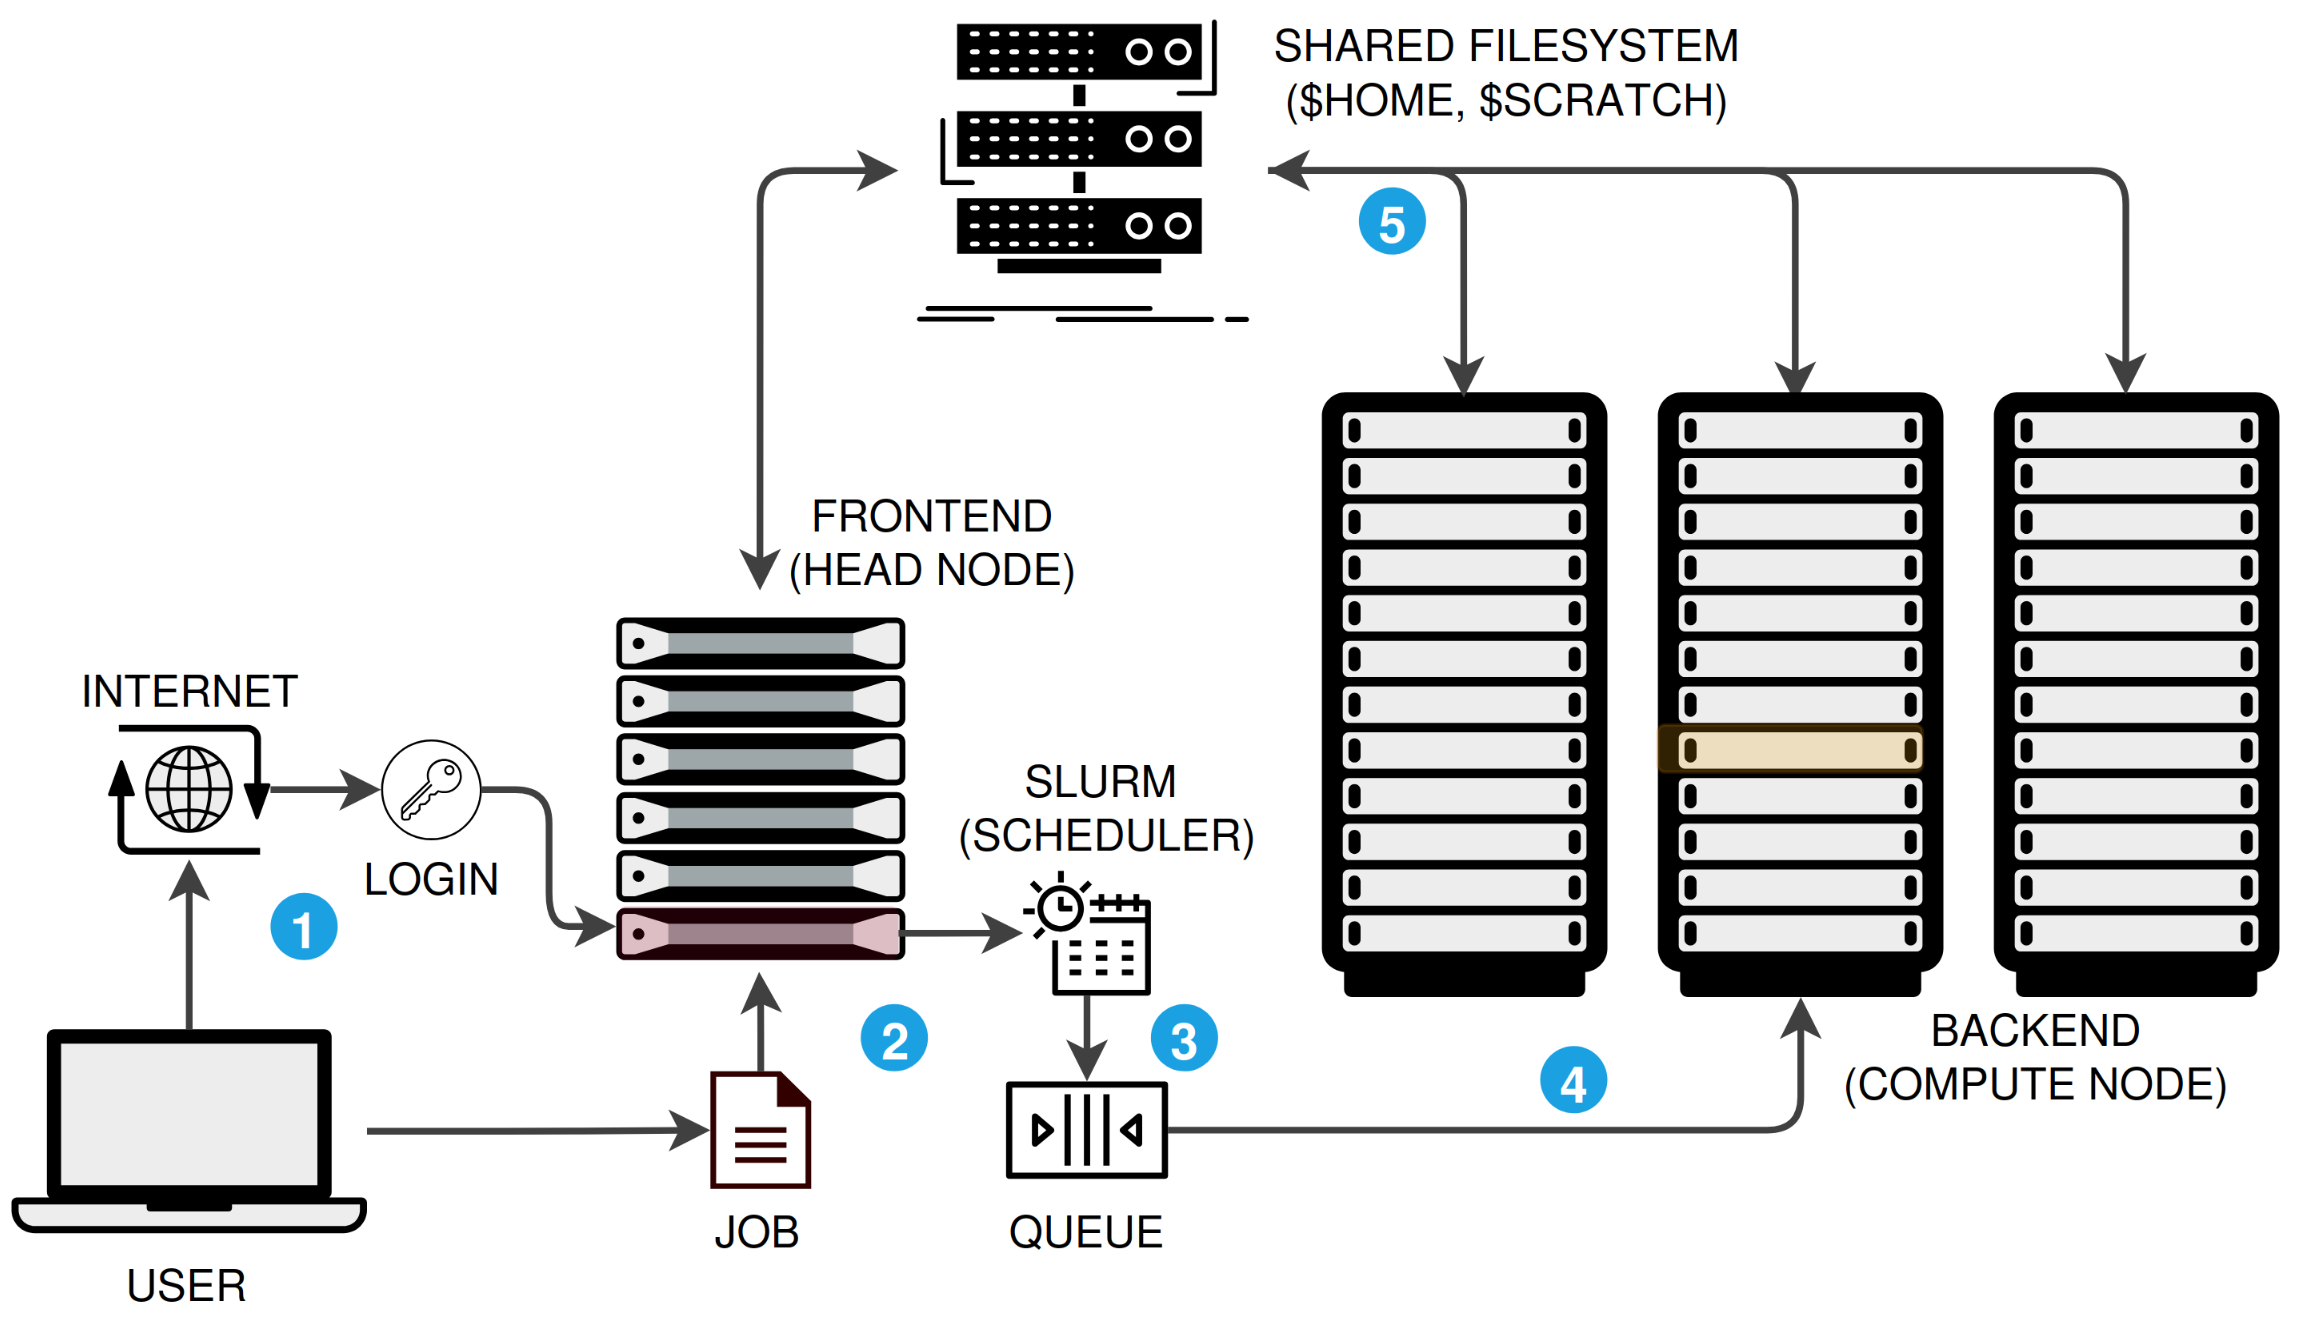
- You log in to a frontend (head/login) node via the internet.
- You write a job script describing the resources you need and submit it.
- SLURM, the scheduler, places your job in a queue and waits for resources.
- When resources are available, SLURM runs your job on one or more compute nodes.
- All nodes read and write to a shared filesystem (
$HOME,$RCAC_SCRATCH), so your data is accessible everywhere.
Accessing the cluster
There are three ways to connect. All three land you on the same login nodes with access to the same filesystems and software.
| Method | Best for | Requires installation? |
|---|---|---|
| Open OnDemand (OOD) | Browser-based access, file browsing, interactive apps | No |
| SSH | Command-line power users, scripting, automation | No (built into macOS/Linux); PuTTY or WSL on Windows |
| ThinLinc | Full Linux desktop, GUI tools (IGV, RStudio, CellProfiler) | Yes (ThinLinc client) |
Pick the method that fits your workflow and follow the instructions below:
Recommended starting point. Open OnDemand provides a web portal with a file browser, terminal, job submission forms, and interactive apps like JupyterLab and RStudio. No software to install.
-
Navigate to the OOD portal
Go to
https://gateway.<cluster>.rcac.purdue.eduand log in with your Purdue (BoilerKey) credentials.Cluster OOD URL Gautschi gateway.gautschi.rcac.purdue.edu Negishi gateway.negishi.rcac.purdue.edu Bell gateway.bell.rcac.purdue.edu Gilbreth gateway.gilbreth.rcac.purdue.edu -
Tour the dashboard
After login you will see the OOD dashboard with these key sections:
- Files: Browse, upload, download, and edit files on the cluster
- Jobs: View active jobs or use the Job Composer to build submission scripts
- Clusters: Open a shell terminal (equivalent to SSH) directly in the browser
- Interactive Apps: Launch JupyterLab, RStudio Server, and other GUI applications
-
Open a terminal
Click Clusters in the top menu and select the cluster shell access (e.g., Gautschi Shell Access). A terminal opens in your browser. You are now on a login node.
Tip
OOD is the fastest way to get started because there are no SSH keys to configure. If you are new to HPC, start here.
SSH gives you direct terminal access. It is built into macOS and Linux. On Windows, use PowerShell, WSL, PuTTY, or MobaXterm.
Replace <boilerid> with your Purdue career account username. For other clusters, replace gautschi with the cluster name.
Tip
For password-less login and SSH shortcuts (e.g., ssh gautschi instead of the full hostname), see the SSH Keys and Configuration section of the Productivity Toolkit.
ThinLinc provides a full Linux desktop environment, ideal for GUI-based tools like IGV, CellProfiler, MEGA, or any application that needs a graphical interface.
-
Install the ThinLinc client
Download and install the ThinLinc client for your operating system from the ThinLinc download page.
-
Connect to the cluster
Open the ThinLinc client and enter the connection details:
Field Value Server desktop.<cluster>.rcac.purdue.eduUsername Your Purdue career account (BoilerID) Password Your Purdue password For example, to connect to Gautschi:
desktop.gautschi.rcac.purdue.edu -
Authenticate
After entering your credentials, you will be prompted for MFA two-factor authentication. Approve the push notification or enter the code.
-
Use the desktop
You now have a full Linux desktop. Open a terminal from the Applications menu to run commands, or launch GUI applications directly.
You can also access ThinLinc through a web browser (no client install needed) at https://desktop.<cluster>.rcac.purdue.edu/. The native client generally provides a smoother experience.
For detailed ThinLinc documentation, see the RCAC ThinLinc guide.
Warning
Login nodes are shared. Whichever method you use to connect, you land on a login node. Do not run computationally intensive programs here. Use sinteractive for quick tests or sbatch for real work (see Submitting jobs with SLURM below).
Using modules and biocontainers
RCAC deploys bioinformatics tools as BioContainers, pre-built Apptainer containers accessed through the Lmod module system. You do not need to install most tools yourself.
The critical first step: purge before loading
Always start with module --force purge before loading any modules. This removes all previously loaded modules, including sticky system modules that can cause conflicts with containerized tools.
The biocontainers module unlocks all bioinformatics software. You must load it before any bioinformatics tool module becomes visible.
Danger
Do not skip --force. A plain module purge leaves behind sticky modules like xalt that use a newer glibc and will cause cryptic errors like:
Searching for a tool
module spider searches all modules, including those not yet visible. It shows available versions and prerequisites.
Loading a tool
After loading, run the tool as usual. Behind the scenes, RCAC creates shell function wrappers that transparently route your command through the container. You do not need to interact with Apptainer/Singularity directly.
Tip
Always specify the version in every module load command. module load biocontainers samtools may give you a different default version tomorrow. Explicit versions are essential for reproducibility.
Quick reference
| Command | Purpose |
|---|---|
module --force purge |
Clean your environment (always do this first) |
module load biocontainers |
Enable access to bioinformatics tools |
module spider <tool> |
Search for a tool and its available versions |
module spider <tool>/<version> |
Show loading instructions for a specific version |
module avail |
List all currently loadable modules |
module list |
Show what is currently loaded |
module load biocontainers <tool>/<version> |
Load a specific tool |
module show <tool>/<version> |
See what environment variables a module sets |
How biocontainers work (briefly)
When you load a biocontainer module, RCAC creates a shell function that wraps the tool command in an apptainer run call. For example, loading bwa creates a function so that typing bwa actually runs:
For most use cases this is invisible. If you need more detail, see Understanding the wrapper in the Running Bioinformatics guide.
Requesting a new biocontainer
If a tool is not available via module spider after loading biocontainers, you can request it:
- Email rcac-help@purdue.edu with the subject line including "genomics"
- Include the tool name, version, and a link to the tool (e.g., its Bioconda or BioContainers page)
- RCAC will build and deploy the container, typically within a few business days
While waiting, you can install the tool yourself using Conda or by pulling a custom container. See How Do I Find and Run Software X? for the full decision tree.
Submitting jobs with SLURM
SLURM (Simple Linux Utility for Resource Management) is the job scheduler on all RCAC clusters. It manages the queue so that all users get fair access to compute resources.
The mental model: you describe what resources your job needs (CPUs, memory, time), submit it to the queue, and SLURM runs it on a compute node when resources are available.
Nodes, cores, and memory: what are you requesting?
Before writing your first job script, it helps to understand what a compute node actually contains. Each SLURM directive maps to a physical component inside the node.
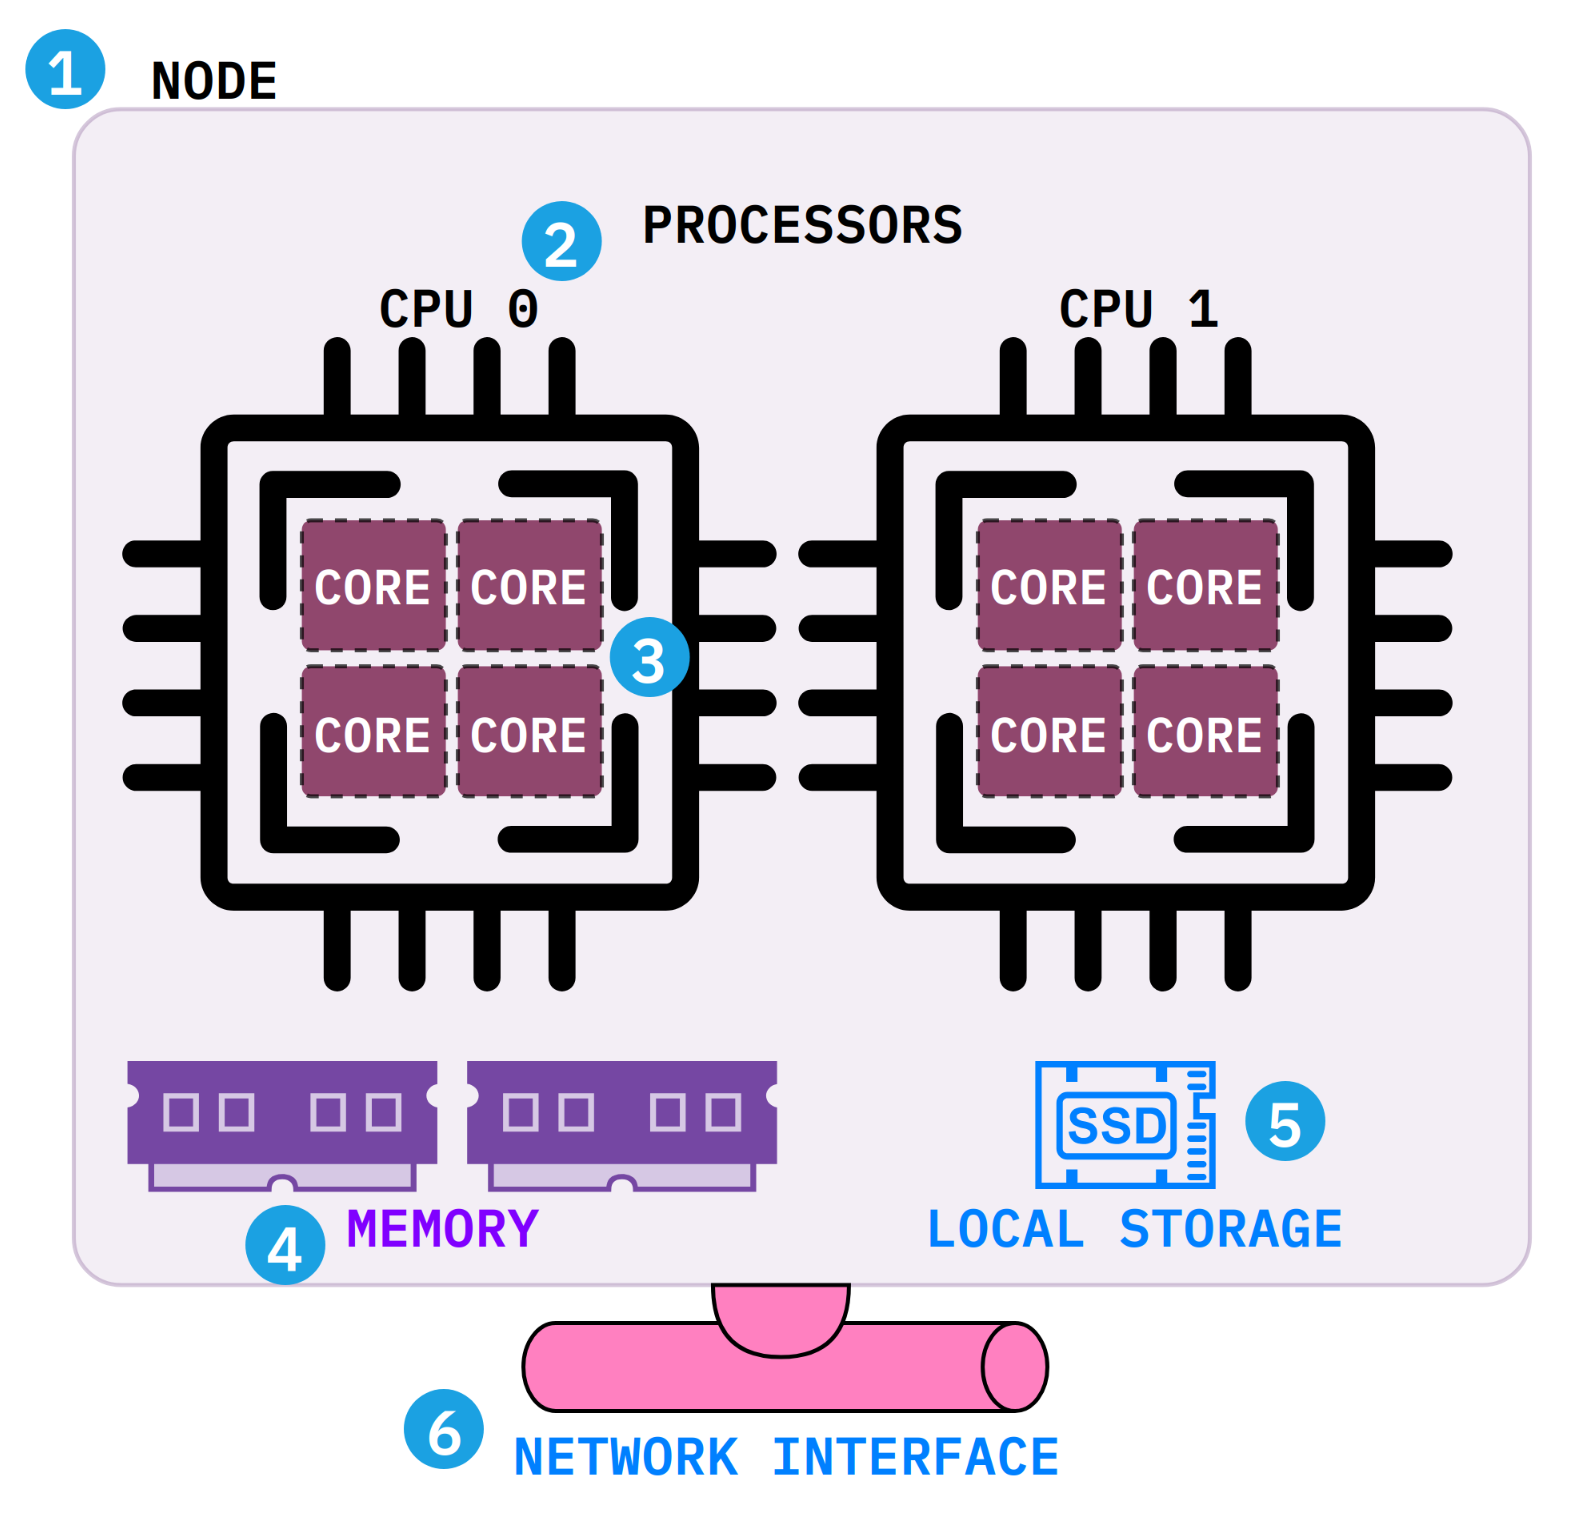
- Node: A single physical server in the cluster. Your job runs on the resources within this machine. Most bioinformatics jobs need only one node (
--nodes=1). - Processors and cores: A core is the basic processing unit. Multiple cores are grouped into a processor (CPU). When a tool asks for "threads," you are requesting cores (
--cpus-per-task). - Memory (RAM): The node's short-term working space, shared by all cores. Request what your tool needs with
--mem(e.g.,--mem=32G). - Local storage: Fast, temporary disk on the node (
$TMPDIR) for scratch files during a job. It is deleted when the job ends. - Network: Connects the node to the shared filesystems (
$HOME,$RCAC_SCRATCH) where your data lives.
Tip
A common mistake is requesting multiple nodes when your tool only uses threads. Almost all bioinformatics tools (BWA, STAR, SAMtools, BLAST) run on a single node. Set --nodes=1 and increase --cpus-per-task instead.
Interactive jobs
Interactive jobs give you a shell on a compute node for testing, debugging, and exploratory work. Use them when you need to try commands before writing a batch script.
| Flag | Meaning |
|---|---|
-A <account-name> |
Your allocation/account (check with slist) |
-n 4 |
Number of CPU cores |
-N 1 |
Number of nodes (almost always 1) |
-t 1:00:00 |
Wall time (hours:minutes:seconds) |
Once the session starts, you are on a compute node and can load modules, run tools, and test your workflow. Type exit when done to release the resources.
Tip
Use interactive sessions for: testing new tools, debugging failed jobs, running short exploratory analyses, and confirming that your batch script logic works before submitting the full run.
Interactive vs. batch: two ways to run jobs
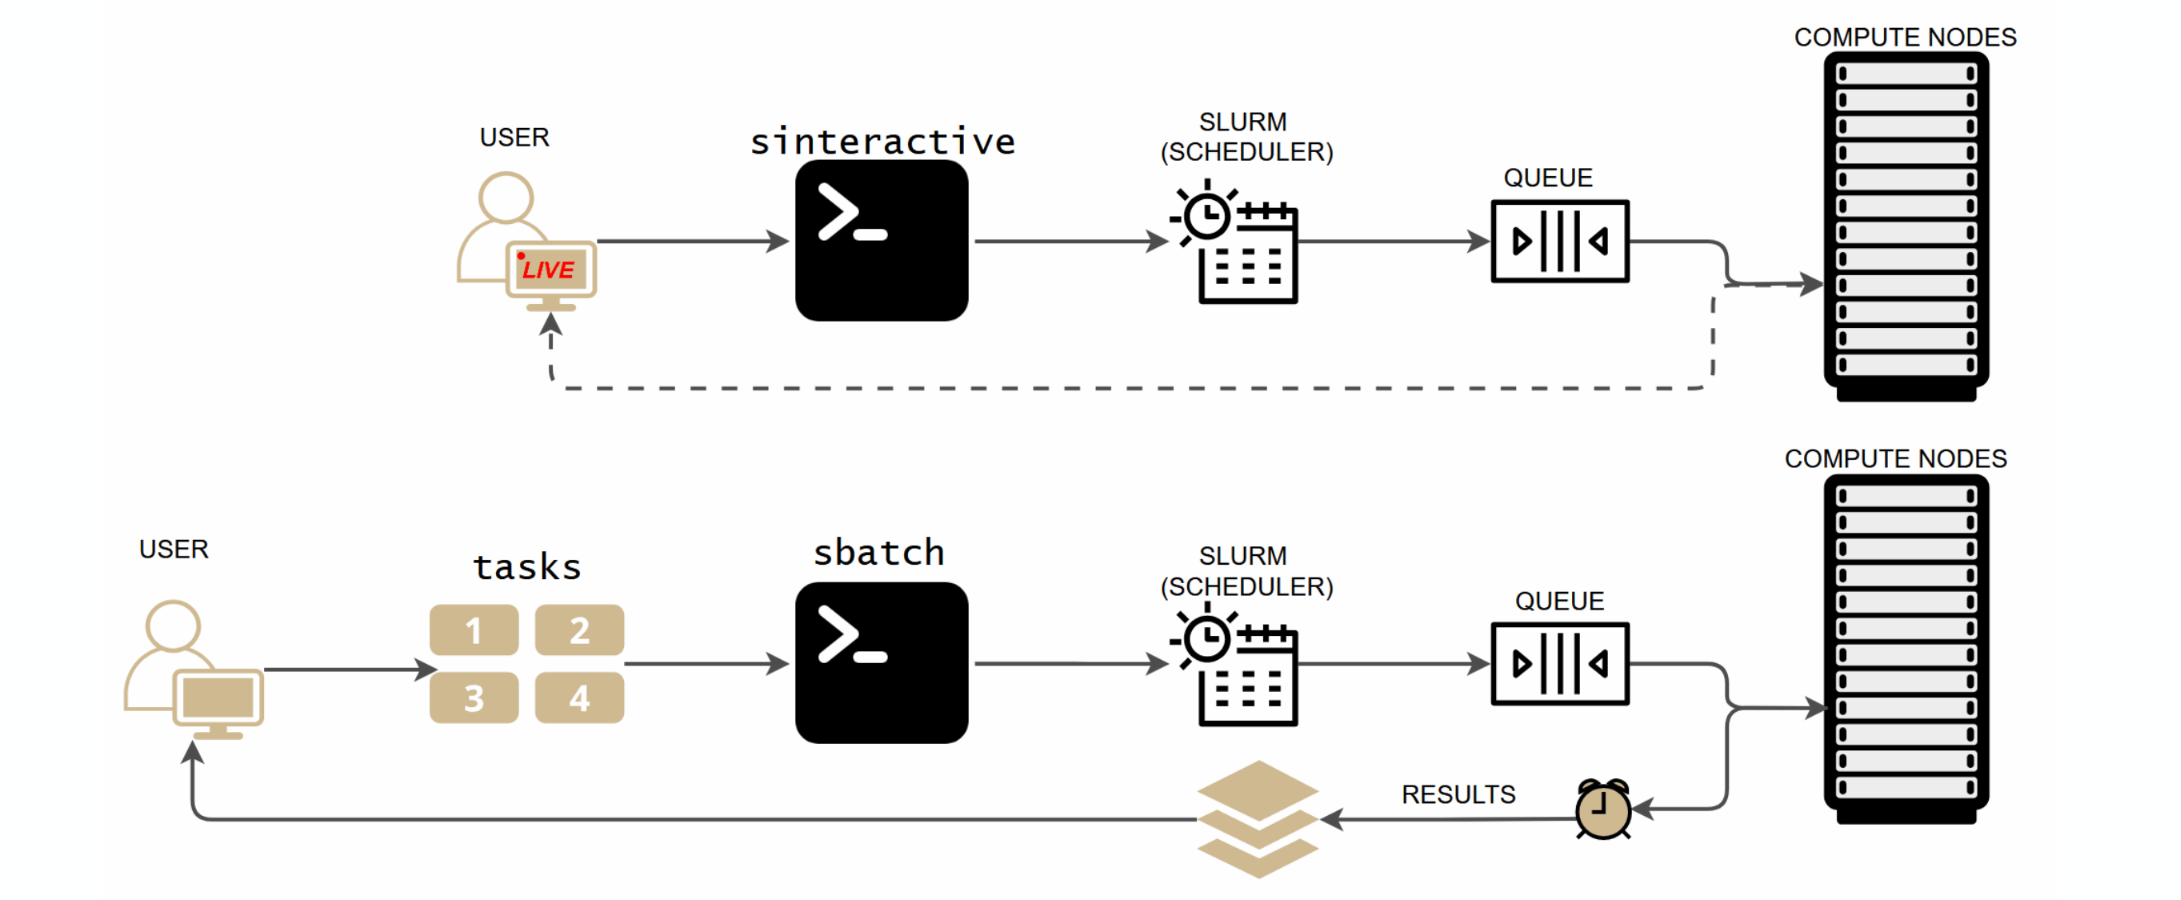
SLURM offers two ways to run work on compute nodes. Interactive (sinteractive) gives you a live terminal session for testing and exploration. Batch (sbatch) submits a script that runs unattended, and you collect results when it finishes. Use interactive mode to develop your workflow, then switch to batch for production runs.
Batch jobs
For real workloads, write a batch script and submit it with sbatch. The job runs unattended on a compute node; you collect results when it finishes.
A SLURM batch script has three parts:
- Shebang:
#!/bin/bash #SBATCHdirectives: resource requests (parsed by SLURM, not executed by bash)- Your commands: module loads, tool invocations, file operations
Some tools (e.g., Helixer, AlphaFold, deep learning frameworks) require GPU resources. Request GPUs with the --gpus-per-node directive and use the appropriate GPU partition.
Key differences from CPU jobs:
- Use
--partition=gpu(checksfeaturesfor available GPU partitions on your cluster) - Add
--gpus-per-node=1(or more, depending on your tool) - Some tools require specific GPU types; use
--constraintor--gres=gpu:<type>:1if needed
Submit and monitor:
SBATCH directive reference
#SBATCH directive |
Description | Typical value |
|---|---|---|
--account |
Allocation to charge | Check with slist |
--partition |
Queue/partition | Cluster-specific (e.g., cpu, gpu) |
--nodes |
Number of nodes | 1 (almost always for bioinformatics) |
--ntasks |
Number of processes | 1 for single tools |
--cpus-per-task |
Threads per process | Match tool's thread flag (4 to 32) |
--time |
Wall clock limit | Start generous, tighten after sacct |
--mem |
Total memory | Check tool docs; start with 16 to 32G |
--gpus-per-node |
GPUs per node (GPU jobs only) | 1 for most tools |
--output |
stdout log file | %x_%j.out (job name + job ID) |
--error |
stderr log file | %x_%j.err |
Warning
Request only what you need. Asking for 64 CPUs when your tool is single-threaded wastes your allocation priority and makes your job wait longer in the queue. Start with a small test run, check jobinfo <jobid> for actual CPU, memory, and walltime usage, then right-size.
Useful SLURM commands
| Command | Purpose |
|---|---|
slist |
Show your accounts, available partitions, and resource limits |
sfeatures |
Show available hardware features (CPU types, GPUs, memory per node) |
squeue -u ${USER} |
Check status of your jobs |
scontrol show job <jobid> |
Detailed info about a specific job |
sacct -j <jobid> |
Job history, resource usage, exit status |
jobinfo <jobid> |
Friendly summary: walltime, memory, CPU efficiency, disk I/O |
scancel <jobid> |
Cancel a running or queued job |
sinteractive |
Launch an interactive session |
For the full SLURM guide including array jobs, Conda in SLURM, debugging failed jobs, and common pitfalls, see Submitting SLURM Jobs in the Running Bioinformatics guide.
Storage
RCAC provides multiple storage tiers. Understanding when to use each one prevents quota issues and data loss.
Storage tiers
| Storage | Path | Capacity | Persistence | Best for |
|---|---|---|---|---|
| Home | $HOME |
~25 GB | Permanent, nightly snapshots | Scripts, configs, small critical files |
| Scratch | $RCAC_SCRATCH |
Very large (100+ TB shared) | Purged after 60 days of inactivity | Active analysis, intermediate files, job outputs |
| Depot | /depot/<group>/ |
PI-purchased (1 TB increments) | Permanent, backed up, no purge | Shared lab data, raw sequences, final results |
| Node-local | $TMPDIR |
Varies by node | Deleted when job ends | Fast temporary files within a single job |
Danger
Scratch has no backups and is purged after 60 days of inactivity. Run purgelist to check if any of your files are scheduled for deletion. Never keep your only copy of anything on Scratch. Move important results to Depot or Home promptly.
Practical rules
- Raw sequencing data: Depot (permanent, backed up). Symlink into your Scratch project directory.
- Active analysis outputs: Scratch (fast, large capacity). Move final results to Depot when done.
- Scripts, configs, READMEs: Home or Depot. Small and irreplaceable.
- Temporary per-job files:
$TMPDIRon the compute node. Fastest I/O, automatically cleaned.
Monitoring your usage
These commands help you check storage consumption and available compute resources. Run them on a login node.
| Command | What it shows | When to use |
|---|---|---|
myquota |
Disk usage and limits for Home, Scratch, and Depot | Before starting a large analysis; regularly to avoid quota surprises |
userinfo ${USER} |
Your accounts, quotas, group memberships, and active sessions in one view | Quick overview of your entire cluster profile |
slist |
Your accounts, available partitions, and resource limits | To find your --account name for #SBATCH directives |
sfeatures |
Node hardware: CPU types, core counts, memory, GPUs | To right-size --cpus-per-task, --mem, and --gres requests |
showpartitions |
Partition time limits, node counts, and access policies | To choose the right --partition for your job |
purgelist |
Files on Scratch scheduled for purge | To check if any of your files are about to be deleted |
Tip
Run myquota regularly, especially before starting a large analysis. If Scratch is nearly full, clean up old intermediate files before they cause job failures.
For a detailed guide on project directory structure, naming conventions, and archiving, see Project Organization for Bioinformatics on HPC.
Data transfers
Moving data to and from the cluster is one of the first things you will need to do. Use the right tool for the job size.
| Method | Best for | Key advantage |
|---|---|---|
| Globus | Large datasets (GBs to TBs) | Auto-resume, integrity verification, fire-and-forget |
| rsync | Directory sync, incremental backups | Only transfers changed files |
| scp | Quick single-file transfers | Simple, no setup needed |
| OOD File Browser | Small files, drag-and-drop | No command line needed |
Globus (recommended for large transfers)
Globus is a managed file transfer service designed for research data. It handles large transfers reliably with automatic retry, checksum verification, and the ability to close your laptop while the transfer runs.
-
Access the Globus transfer portal
Go to transfer.rcac.purdue.edu and sign in with your Purdue (BoilerKey) credentials.
-
Find the cluster endpoint
In the Collection search field, type the cluster name (e.g., "Gautschi"). The RCAC endpoint will appear.
Select it and enter the path you want to access. For example:
- Scratch:
/scratch/gautschi/<username>/ - Depot:
/depot/<group>/
- Scratch:
-
Set up the other side
In the second panel, search for your source or destination:
- Another RCAC cluster: Search by cluster name (e.g., "Negishi")
- A collaborator's institution: Search for their Globus endpoint
- Your local computer: Install Globus Connect Personal (GCP), create a personal endpoint, and it will appear when you search
-
Start the transfer
Select files or directories on each side and click Start. Globus handles the rest. You will receive an email notification when the transfer completes.
Tip
Globus is the best choice for transferring sequencing data from a core facility. Many sequencing centers have Globus endpoints, so you can transfer directly without downloading to your laptop first.
rsync (incremental sync)
rsync is a command-line tool that efficiently synchronizes files and directories. It only transfers files that have changed, making it ideal for keeping directories in sync and resuming interrupted transfers.
From a login node on one cluster, rsync to another:
| Flag | Meaning |
|---|---|
-a |
Archive mode (preserves permissions, timestamps, symlinks) |
-v |
Verbose output |
-z |
Compress data during transfer |
-P |
Show progress and enable resume of partial transfers |
Note
The trailing / on the source path matters in rsync. With /: copies the contents of the directory. Without /: copies the directory itself as a subdirectory of the destination.
scp (quick single-file transfers)
For copying a single file or a small number of files:
OOD file browser
For small files, the OOD file browser provides drag-and-drop upload and download directly in the browser. Navigate to Files in the OOD dashboard, browse to your target directory, and use the Upload/Download buttons.
Other transfer methods
For specialized use cases:
- SMB (Windows network drive): Mount Depot as a network drive on campus. See RCAC SMB documentation.
- HSI/HTAR: For interacting with the Fortress tape archive. See RCAC Fortress documentation.
- iRODS/iCommands: For transferring data to/from CyVerse. See our iRODS guide.
Getting help
- Email: rcac-help@purdue.edu (include "genomics" in the subject for bioinformatics questions)
- Service Portal: service.purdue.edu
- Discord: Purdue RCD Discord
- Documentation: rcac.purdue.edu/compute/gautschi (replace
gautschiwith your cluster) - Events and workshops: rcac.purdue.edu/news/events
Tip
When submitting a support ticket, include the cluster name, how you accessed the system, the commands and modules you loaded, the full error message, and steps to reproduce the issue. This helps the support team resolve your problem faster.
What's next
Now that you can connect, run software, submit jobs, and transfer data, explore these topics to level up:
-
RCAC HPC Exchange
Knowledgebase, tips, and training for common HPC tasks on RCAC clusters. Browse the exchange
-
Running Bioinformatics on RCAC
Deep dive into biocontainers, Conda environments, custom containers, array jobs, and debugging failed jobs. Read the guide
-
Productivity Toolkit
SSH keys, SSH config shortcuts, and shell customization for faster daily workflows. Read the guide