Using VS Code on RCAC Community Clusters
Visual Studio Code (VS Code) is a widely used, lightweight IDE that supports remote development via SSH. This makes it a convenient option for researchers less comfortable with terminal-only editors like Vim, especially when developing code or managing data on RCAC resources.
Quick Start
-
Install VS Code locally
-
Install the Remote - SSH extension
-
Set up SSH keys on your local machine and upload your public key to the cluster
-
Configure your SSH config file (
~/.ssh/config) with RCAC cluster details -
Connect to the RCAC cluster using VS Code's Remote - SSH
Basic Setup
1. Install VS Code
- Download the installer for your operating system from the VS Code website
- Run the installer and follow the prompts to complete the installation
- Launch VS Code after the installation is complete
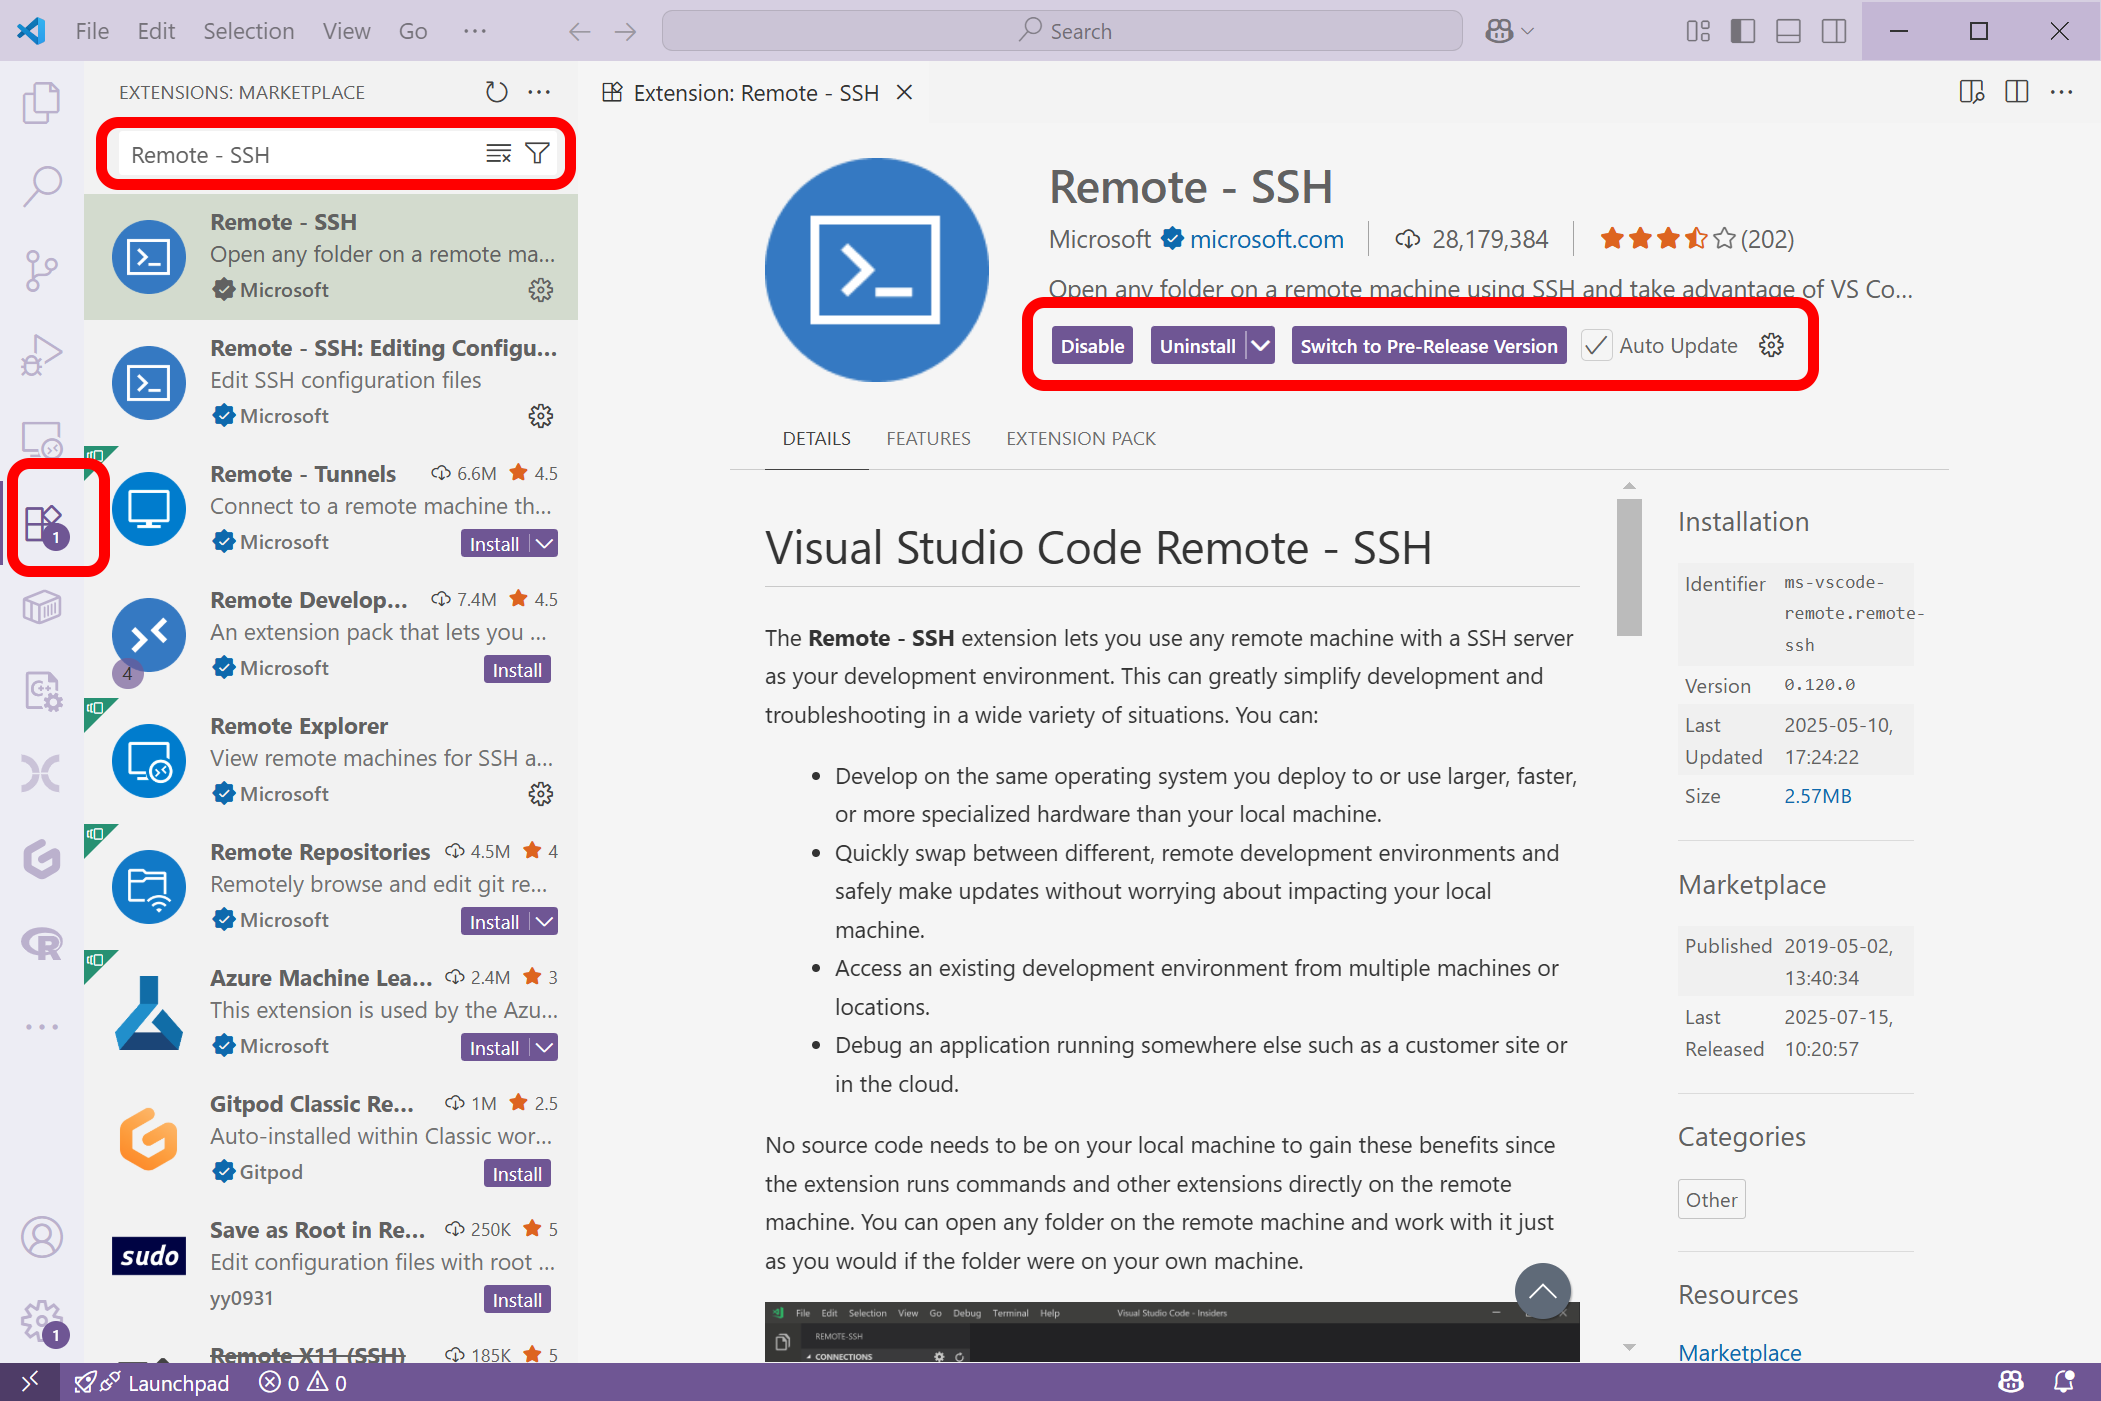
2. Install Remote - SSH Extension
- Open VS Code
- Go to the Extensions view by clicking on the Extensions icon in the Activity Bar on the side
- Search for "Remote - SSH" in the Extensions Marketplace
- Click "Install" to add the extension to your VS Code setup
3. Set Up SSH Keys
SSH keys allow you to connect to the cluster without entering a password each time. The setup differs slightly between operating systems.
Open a terminal and run the following commands:
Option 1: Using PowerShell (Windows 10/11)
Open PowerShell and run:
Copy the output, then SSH into the cluster and add it manually:
Option 2: Using Git Bash
If you have Git for Windows installed, open Git Bash and follow the Linux/macOS instructions above.
4. Configure SSH Config File
The SSH config file tells your system how to connect to each cluster. Open or create ~/.ssh/config in a text editor and add entries for each cluster:
The config file is located at ~/.ssh/config
The config file is located at C:\Users\YourUsername\.ssh\config
| ~/.ssh/config | |
|---|---|
Tip
Replace pete with your Purdue career account username in all entries.
5. Connect to the Cluster
You can connect to the RCAC clusters using VS Code's Remote - SSH extension in several ways:
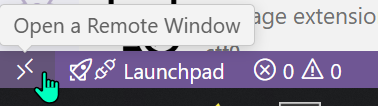
Option 1: Remote Window Button
Click on the blue button in the bottom-left corner of VS Code (shows >< icon), select "Connect to Host...", then choose the cluster you want (e.g., gautschi, negishi, or bell).
Option 2: Command Palette
Open the Command Palette (Ctrl+Shift+P on Windows/Linux, Cmd+Shift+P on macOS), type "Remote-SSH: Connect to Host...", and select your desired cluster.
Option 3: Remote Explorer
Click on the Remote Explorer icon in the Activity Bar on the side, expand the "SSH Targets" section, and click on the cluster you want to connect to.
Once connected, you can open files, run commands in the integrated terminal, and manage your projects on the cluster directly from VS Code.
Advanced Setup: Connecting to Compute Nodes
The basic setup connects you to a login node. However, you may want to connect VS Code directly to a compute node, for example:
- Running Jupyter Notebook inside your local VSCode but having it execute on a compute node
- When running an interactive job and wanting to edit files on the compute node
- When using tools like HyperShell that track which compute node ran each task
- When debugging code that's running on a specific compute node
Advanced SSH Configuration
To connect to a compute node, you must first connect to the login node and then from there connect to a compute node. Why can't we just connect directly to a compute node? When you try this, the connection to the compute node gets blocked by SLURM logic, the job scheduling agent on most HPCs.
When you try to SSH onto a compute node, what happens behind the scenes is it requires that you have an active job running on that compute node already. When you do this from your computer, it cannot determine your cluster username to test this. When you SSH from the login node, it can check your user properly to determine if you have an active job on a compute node.
Note
Imagine if we could just SSH onto a compute node without first scheduling a job there - we could hack the system and use all the compute resources!
Thus, we need to do something called proxy jumping, which allows us to connect to the compute node by first going through the login node. The configuration below enables automatic proxy jumping through the login node to reach compute nodes:
Note
Order matters! SSH processes the config file top-to-bottom and uses the first matching entry. The more specific rules must come before the general ones.
How It Works
-
Direct login node access:
Host gautschi(orHost anvil-login) pins you to a specific login node (login07) for consistent connections -
Compute node proxy: The
Matchblock withProxyCommandautomatically routes connections to compute nodes (e.g.,a123.gautschi.rcac.purdue.edu) through the login node. It basically tells the SSH agent: to connect to a compute node, first go through the login connect (gautschioranvil-login) -
Common settings: The final
Matchblock applies your username, SSH key, and keepalive settings to all RCAC hosts
Using This Configuration
With this setup, you can:
- Connect to the login node:
ssh gautschi - Connect directly to a compute node:
ssh a123.gautschi.rcac.purdue.edu(automatically proxies through login node) - Use VS Code to connect to either login or compute nodes
- Use
sftpto transfer files from compute nodes:sftp a123.gautschi.rcac.purdue.edu
Tip
This is particularly useful with HyperShell. When you run hs info <task_id> --stdout on your laptop, it can automatically SFTP output files from the compute node that ran the task.
VSCode Step-by-Step instructions
Here we go through specific instructions to get an interactive Jupyter Notebook running on your local VSCode but executing through a compute node.
Intuition: SSH'ing into a remote compute can make it hard to both edit and execute files. Many people like to use VSCode, a common IDE, to edit remote files. Beyond just editing, many people prefer to execute code directly from VSCode, which requires a connection to a compute node.
One example includes using Jupyter notebook directly on a compute node through VSCode.
Start here
Tip
For this example, our mock username will be x-neuromancer, so whenever you see this, replace x-neuromancer with your own username.
Further, if you are using an HPC that is not Purdue's Anvil, replace anvil.rcac.purdue.edu with the correct address of your HPC.
Step 1: Download the Remote Explorer extension in VSCode.
Search for this in your extensions tab in VSCode.
Step 2: Edit ~/.ssh/config
This will be on your local computer. We want to start by creating 2 entries:
First: A new host. This SSH config entry contains the information for you to SSH through VSCode onto a login node. I know this isn't what we want right now, but we need this entry. For our example:
Here, we name this config entry anvil-neuromancer. Please change that to the appropriate HPC and username, although the name is arbitrary and can be anything we want. The HostName not only points to the address of the HPC, but it hard-codes a specific login node. If you are not using anvil, your login nodes may have a different naming convention. You can see the name by SSH'ing onto your HPC and typing hostname.
Note
Normally when you ssh onto an HPC, there are several login nodes and you randomly get placed onto one of them. For example, if I type $ ssh x-neuromancer@anvil.rcac.purdue.edu and then $ hostname, I may get login02.anvil.rcac.purdue.edu. The next time, I may get login06.anvil.rcac.purdue.edu.
Second: Match statement so when you eventually SSH directly into the compute node, you go through the login node.
Tip
Please note the pattern login*.anvil.rcac.purdue.edu. If your HPC has a different naming convention for login nodes, you'll have to change this.
For example, if you had login_node08.albion.edu, your match statement would be: "!login_node*.albion.edu".
This match statement works for
login nodes with the pattern: login01.anvil.rcac.purdue or login08.anvil.rcac.purdue.edu, for example.
Why do we need this config block? The answer is because we cannot automatically SSH onto a compute node without first SSH'ing onto a login node. This gets blocked by SLURM, the job scheduling agent on most HPCs. When you try to SSH onto a compute node, what happens behind the scenes is it requires that you have an active job running on that compute node already. Imagine if we could just SSH onto a compute node without first scheduling a job there - we could hack the system and use all the compute resources!
This match block allows us to reach our destination of a compute node by telling the SSH agent to first SSH into the login node, then jump to the compute node. This allows the connection to check if we have a valid, running job on a compute node and approve our request if so. By now, you've probably guessed the next step already.
Step 3: Start an interactive job.
Here, use $ sinteractive or some method to start an interactive job on your terminal. Once you get access, note the specific compute node address it assigned you:
Above, let's say we are assigned the compute node a241.
Step 4: Add a SSH config entry for the compute node
Let's open back up that ~/.ssh/config and add an entry for us to SSH directly onto the compute node.
Above, we name this config entry anvil-compute to differentiate it from anvil-neuromancer, which was our entry to SSH into the login node.
The HostName uses the specific node (or hostname) we were provided in our interactive session!
Danger
Each time you run an interactive session, you may not get the same compute node! We know it's annoying, but if you get a different compute node when you run a job tomorrow, you must change the value of the HostName in your config. You could also add several config entries, each for all the compute nodes, but that's not very practical.
The ProxyCommand must end by matching the Host that defined SSHing into the login node (anvil-neuromancer). Make sure these match. This part tells the SSH agent: to login to this compute node (a241), first go through the login node, and then login to the compute node. If we do not do this, our connection will be blocked.
Step 5: SSH onto the login node
In VSCode, type Cmd/Window + Shift + P to open the command palette, and find Remote-SSH: Connect to Host.... You should see anvil-compute, or whatever you named it. Click on this and you'll have a new VSCode session connected to a compute node!
Step 6: Running a Jupyter Notebook interactively.
Tip
For this, I suggest installing the Jupyter, Jupyter Cell Tags, and Jupyter Keymap extension for VSCode.
Open up a folder from your remote HPC and find your Jupyter Notebook in the file explorer. Click on it to open it up; it should look like your comfortable Jupyter Notebook interface.
To run code, you'll need to specify a kernel, which can be a virtual environment (this is because VSCode takes care of the server and just needs a path to point to). When you first click the Run button to the left of your code cell, it'll prompt you to specify a kernel/environment. If you do not have a virtual environment setup, create one for your notebook.
Tip
To create a virtual environment, you can go into the VSCode terminal and type $ python -m venv .venv and it'll create a folder called .venv that
contains your virtual environment. Point your Jupyter kernel here and it'll run through that. To add new packages, activate the environment
($ source .venv/bin/activate using terminal) and then pip install <package>. You can also use anaconda/conda for package management, or uv.
Step 7: Verifying you are running on a compute node.
Finally, let's make for certain we are running on a compute node. Type the following into a cell in your Jupyter notebook:
Above, ensure the output prints the correct compute node (a241.anvil.rcac.purdue.edu for my example), and not a login node (login01.anvil.rcac.purdue.edu).
Now you are an SSH and VSCode wizard, Harry!
Extending to Other Clusters
To add the same capability for other clusters, replicate the pattern:
Troubleshooting
Connection Times Out
- Verify you're on the Purdue network or connected to the Purdue VPN
- Check that the cluster is not under maintenance at RCAC Status
"Permission Denied" Errors
-
Verify your SSH key is correctly added to the cluster:
Look for lines mentioning your key file -
Check file permissions on the cluster:
VS Code Keeps Asking for Password
- Ensure your SSH key path in the config file is correct
- On Windows, make sure the path uses forward slashes or escaped backslashes:
"Remote Host Identification Has Changed" Error
This can happen when cluster login nodes are updated. Remove the old key:
Connection Drops Frequently
Add keepalive settings to your SSH config to prevent idle disconnections: