Getting started with Anvil
Start here
Before you can log in to Anvil, ensure you have completed the steps for your allocation type:
For ACCESS allocations:
- Created your ACCESS account
- Applied for a project
- Received credits in ACCESS
- Transferred your credits to Anvil
Anvil account creation
For ACCESS allocations, unless you have transferred credits onto Anvil, you will not have a valid Anvil username. This will result in errors that may look like: failed to map user <username@access-cli.com>. If you are not the PI of the project, ensure the PI has added you to the project and exchanged credits to Anvil. For NAIRR allocations, your account is created automatically when your allocation is approved.
For NAIRR allocations:
- Create your ACCESS account
- Apply for a project through the NAIRR Pilot
- Your allocation on Anvil is approved (no credit transfer required with NAIRR—when your NAIRR proposal is accepted for Anvil resources, or when your transfer request to Anvil is accepted, your allocation is automatically available)
- For more information on NAIRR allocation management, see the NAIRR section.
Logging in
To Access Anvil, you can login through a variety of ways:
Other ways to access Anvil
Many other ways exist to access Anvil that piggyback on SSH or other technology. If you use a method not listed here, please note we may be limited in the support we can give for accessing Anvil in such a way.
SSH
Anvil accepts standard SSH connections with public keys-based authentication to anvil.rcac.purdue.edu using your Anvil username:
Note about using SSH on Anvil
- Your Anvil username is not the same as your ACCESS username (although it is derived from it). Anvil usernames look like
x-ACCESSusernameor similar, starting with anx-. - Password-based authentication is not supported on Anvil (in favor of SSH keys). There is no "Anvil password", and your ACCESS password will not be accepted by Anvil's SSH either. SSH keys can be set up from the Open OnDemand interface on Anvil ondemand.anvil.rcac.purdue.edu. Please follow the steps in Setting up SSH keys to add your SSH key on Anvil.
- When reporting SSH problems to the help desk, please execute the ssh command with the -vvv option and include the verbose output in your problem description.
SSH keys
To connect to Anvil using SSH keys, you must follow three high-level steps:
- Generate a key pair consisting of a private and a public key on your local machine.
- Copy the public key to the cluster and append it to
$HOME/.ssh/authorized_keysfile in your account. - Test if you can ssh from your local computer to the Anvil cluster directly.
Detailed steps for different operating systems and specific SSH client softwares are give below.
Mac and Linux:
-
Run
ssh-keygenin a terminal on your local machine.You may supply a filename and a passphrase for protecting your private key, but it is not mandatory. To accept the default settings, press Enter without specifying a filename.
Note
If you do not protect your private key with a passphrase, anyone with access to your computer could SSH to your account on Anvil.
By default, the key files will be stored in
~/.ssh/id_rsaand~/.ssh/id_rsa.pubon your local machine. -
Go to the
~/.sshfolder in your local machine andcatthe key information in theid_rsa.pub file. -
For your first time login to Anvil, please log in to Open OnDemand ondemand.anvil.rcac.purdue.edu using your ACCESS username and password.
-
Once logged on to OnDemand, go to the
Clusterson the top toolbar. ClickAnvil Shell Accessand you will be able to see the terminal.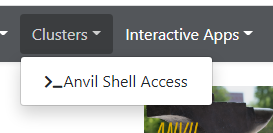
-
Under the home directory on Anvil, make a
.sshdirectory usingmkdir -p ~/.sshif it does not exist.
Create a file~/.ssh/authorized_keyson the Anvil cluster and copy the contents of the public keyid_rsa.pubin your local machine into~/.ssh/authorized_keys. -
Test the new key by SSH-ing to the server. The login should now complete without asking for a password.
-
If the private key has a non-default name or location, you need to specify the key by
ssh -i my_private_key_name x-anvilusername@anvil.rcac.purdue.edu.
Windows:
Windows SSH Instructions
| Programs | Instructions |
|---|---|
| MobaXterm | Open a local terminal and follow Linux steps |
| Git Bash | Follow Linux steps |
| Windows 10 PowerShell | Follow Linux steps |
| Windows 10 Subsystem for Linux | Follow Linux steps |
| PuTTY | Follow steps below |
PuTTY:
-
Launch PuTTYgen, keep the default key type (RSA) and length (2048-bits) and click Generate button.
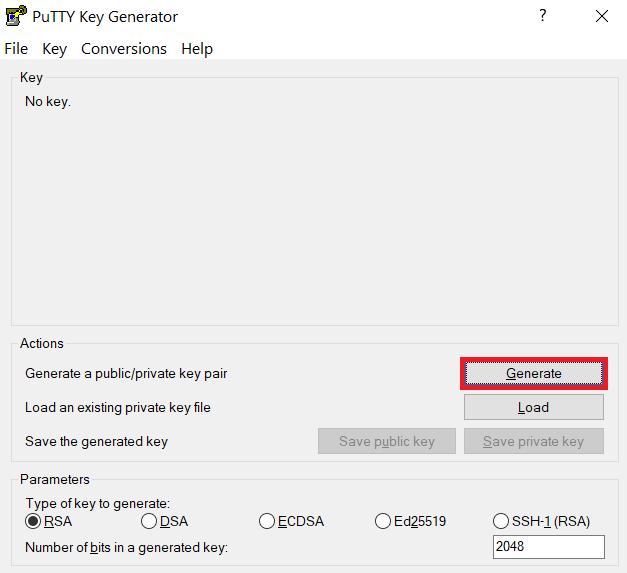
The "Generate" button can be found under the "Actions" section of the PuTTY Key Generator interface. -
Once the key pair is generated:
Use the Save public key button to save the public key, e.g.
Documents\SSH_Keys\mylaptop_public_key.pubUse the Save private key button to save the private key, e.g.
Documents\SSH_Keys\mylaptop_private_key.ppk. When saving the private key, you can also choose a reminder comment, as well as an optional passphrase to protect your key, as shown in the image below.Note
If you do not protect your private key with a passphrase, anyone with access to your computer could SSH to your account on Anvil.
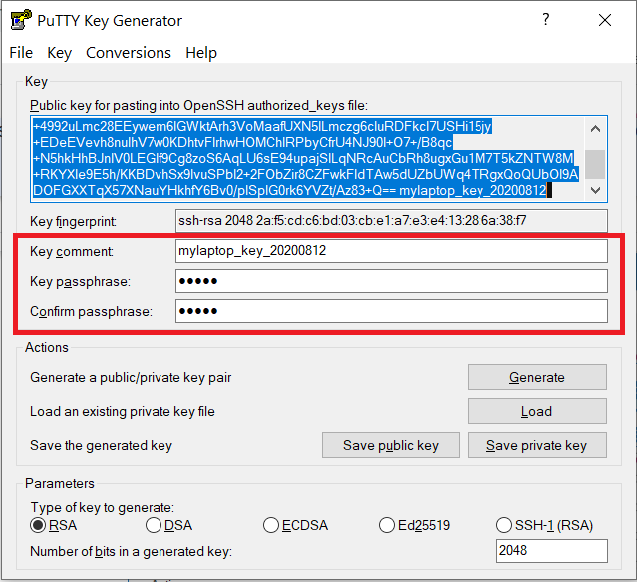
The PuTTY Key Generator form has inputs for the Key passphrase and optional reminder comment. From the menu of PuTTYgen, use the "Conversion -> Export OpenSSH key" tool to convert the private key into openssh format, e.g.
Documents\SSH_Keys\mylaptop_private_key.opensshto be used later for Thinlinc. -
Configure PuTTY to use key-based authentication:
Launch PuTTY and navigate to "Connection -> SSH ->Auth" on the left panel, click Browse button under the "Authentication parameters" section and choose your private key, e.g. mylaptop_private_key.ppk
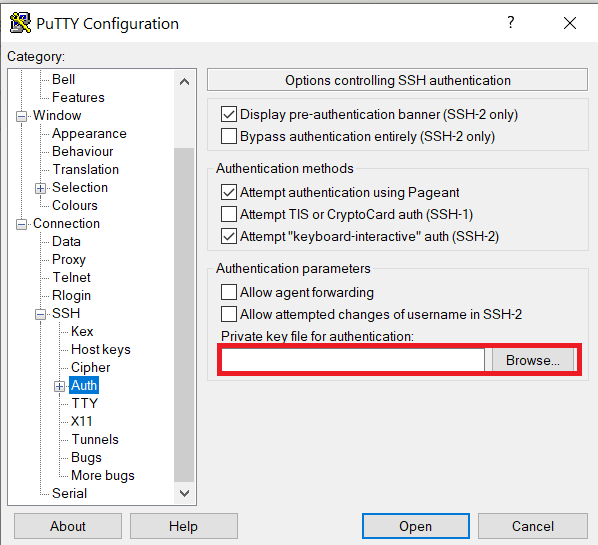
After clicking Connection -> SSH ->Auth panel, the "Browse" option can be found at the bottom of the resulting panel. Navigate back to "Session" on the left panel. Highlight "Default Settings" and click the "Save" button to ensure the change in place.
-
For your first time login to Anvil, please log in to Open OnDemand ondemand.anvil.rcac.purdue.edu using your ACCESS username and password.
-
Once logged on to OnDemand, go to the
Clusterson the top toolbar. ClickAnvil Shell Accessand you will be able to see the terminal.
Anvil Shell Access -
Under the home directory on Anvil, make a
.sshdirectory usingmkdir -p ~/.sshif it does not exist.
Create a file~/.ssh/authorized_keyson the Anvil cluster and copy the contents of the public keyid_rsa.pubin your local machine into~/.ssh/authorized_keys.and copy the contents of public key from PuTTYgen as shown below and paste it into
~/.ssh/authorized_keys. Please double-check that your text editor did not wrap or fold the pasted value (it should be one very long line).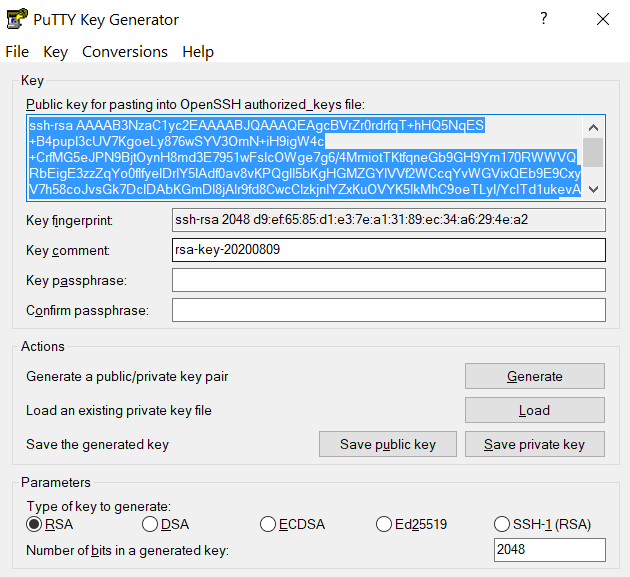
The "Public key" will look like a long string of random letters and numbers in a text box at the top of the window. -
Test by connecting to the cluster and the login should now complete without asking for a password. If you chose to protect your private key with a passphrase in step 2, you will be prompted to enter the passphrase when connecting.
OnDemand
Navigate to Anvil OnDemand and use your ACCESS credentials to login.
ThinLinc
Note
For your first time accessing Anvil using ThinLinc client, your desktop might be locked after it has been idle for more than 5 minutes. It is because in the default settings, the "screensaver" and "lock screen" are turned on. To solve this issue, please refer to the FAQs Page.
Anvil provides Cendio's ThinLinc as an alternative to running an X11 server directly on your computer. It allows you to run graphical applications or graphical interactive jobs directly on Anvil through a persistent remote graphical desktop session.
ThinLinc is a service that allows you to connect to a persistent remote graphical desktop session. This service works very well over a high latency, low bandwidth, or off-campus connection compared to running an X11 server locally. It is also very helpful for Windows users who do not have an easy to use local X11 server, as little to no setup is required on your computer.
There are two ways in which to use ThinLinc: preferably through the native client or through a web browser.
Note
Browser-based Thinlinc access is not supported on Anvil at this moment. Please use native Thinlinc client with SSH keys.
Installing the ThinLinc native client
The native ThinLinc client will offer the best experience especially over off-campus connections and is the recommended method for using ThinLinc. It is compatible with Windows, Mac OS X, and Linux.
- Download the ThinLinc client from the ThinLinc website.
- Start the ThinLinc client on your computer.
- In the client's login window, use
desktop.anvil.rcac.purdue.eduas the Server and use your Anvil usernamex-anvilusername. - At this moment, an SSH key is required to login to ThinLinc client. For help generating and uploading keys to the cluster, see SSH Keys section in our user guide for details.
Configure ThinLinc to use SSH Keys
-
To set up SSH key authentication on the ThinLinc client:
-
Open the Options panel, and select Public key as your authentication method on the Security tab.
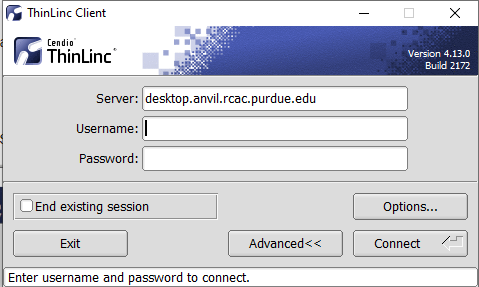
The "Options..." button in the ThinLinc Client can be found towards the bottom left, above the "Connect" button. -
In the options dialog, switch to the "Security" tab and select the "Public key" radio button:
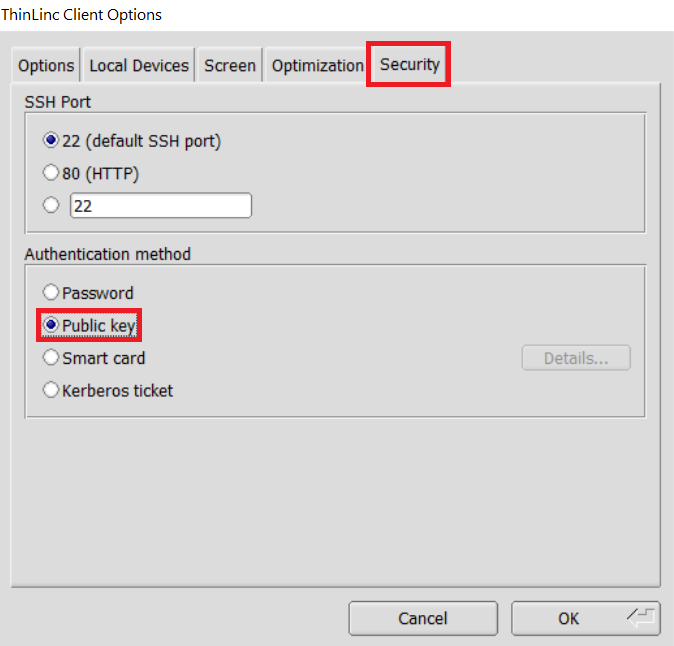
The "Security" tab found in the options dialog, will be the last of available tabs. The "Public key" option can be found in the "Authentication method" options group. -
Click OK to return to the ThinLinc Client login window. You should now see a Key field in place of the Password field.
-
In the Key field, type the path to your locally stored private key or click the
...button to locate and select the key on your local system.Note
If PuTTY is used to generate the SSH Key pairs, please choose the private key in the openssh format.
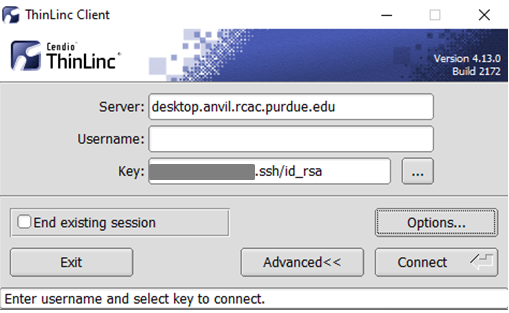
The ThinLinc Client login window will now display key field instead of a password field.
-
-
Click the Connect button.
- Continue to following section on connecting to Anvil from ThinLinc.
Connecting to Anvil from ThinLinc
- Once logged in, you will be presented with a remote Linux desktop running directly on a cluster login node.
- Open the terminal application on the remote desktop.
-
Once logged in to the Anvil login node, you may use graphical editors, debuggers, software like Matlab, or run graphical interactive jobs. For example, to test the X forwarding connection issue the following command to launch the graphical editor
geany: -
This session will remain persistent even if you disconnect from the session. Any interactive jobs or applications you left running will continue running even if you are not connected to the session.
Tips for using ThinLinc native client
- To exit a full-screen ThinLinc session press the
F8key on your keyboard (fn + F8 keyfor Mac users) and click to disconnect or exit full screen. - Full-screen mode can be disabled when connecting to a session by clicking the Options button and disabling full-screen mode from the Screen tab.
Checking Your Balance
Anvil uses Service Units (SUs) as a way to meter our users use of the compute resources. Below is a table to view your current service unit availability, as well as monitory how those service units have been used.
| Tool | Use |
|---|---|
mybalance |
Check the allocation usage of your project team. |
seff <jobid> |
Show the resource usage of a completed job |
jobsu <jobid> |
Show the total service units used for a completed job |
My Data Locations
By default, you will have access to three different storage locations:
- /home/
: 25GB of space - $PROJECT: 5TB of space (can request more)
- $SCRATCH: 100TB of storage with a 1 million file limit.
See File Management for more information.
Storage etiquette
We advice not to add virtual environments or any big files to your $HOME directory. Virtual environments can exceed the disk quota limit of home quickly and are often better off stored at your $PROJECT space.
Submitting your first job
To submit a job, you must use the #SBATCH header sections and at a minimum specify:
-por--partition-Aor--account
--account
If you do not specify an account, you may get unwanted results due to a default --account being chosen for you.
Helpful Tips
We will strive to ensure that Anvil serves as a valuable resource to the national research community. We hope that you the user will assist us by making note of the following:
- You share Anvil with thousands of other users, and what you do on the system affects others. Exercise good citizenship to ensure that your activity does not adversely impact the system and the research community with whom you share it. For instance: do not run jobs on the login nodes and do not stress the filesystem.
- Help us serve you better by filing informative help desk tickets. Before submitting a help desk ticket do check what the user guide and other documentation say. Search the internet for key phrases in your error logs; that's probably what the consultants answering your ticket are going to do. What have you changed since the last time your job succeeded?
- Describe your issue as precisely and completely as you can: what you did, what happened, verbatim error messages, other meaningful output. When appropriate, include the information a consultant would need to find your artifacts and understand your workflow: e.g. the directory containing your build and/or job script; the modules you were using; relevant job numbers; and recent changes in your workflow that could affect or explain the behavior you're observing.
- Have realistic expectations. Consultants can address system issues and answer questions about Anvil. But they can't teach parallel programming in a ticket and may know nothing about the package you downloaded. They may offer general advice that will help you build, debug, optimize, or modify your code, but you shouldn't expect them to do these things for you.
- Be patient. It may take a couple of business days for a consultant to get back to you, especially if your issue is complex. It might take an exchange or two before you and the consultant are on the same page. If the admins disable your account, it's not punitive. When the file system is in danger of crashing, or a login node hangs, they don't have time to notify you before taking action.
Helpful Tools
The Anvil cluster provides a list of useful auxiliary tools. The following table provides a list of auxiliary tools:
| Tool | Use |
|---|---|
userinfo <username> |
See all groups you are a part of, as well as storage locations and associated accounts |
myquota |
Check the quota of different file systems. |
flost |
A utility to recover files from snapshots. |
showpartitions |
Display all Slurm partitions and their current usage. |
mybalance |
Check the allocation usage of your project team. |
Next Steps
Please see the rest of our User Guide for more comprehensive information about Anvil.
Read our full user guide
We strongly suggest you read, or at the very least skim through, our whole user guide so you can have answers to questions you may ask in the future.