HPC Crash Course
This page condenses the essentials of High Performance Computing (HPC) into a single quick orientation for new users of RCAC clusters. It covers:
- What a cluster is
- Getting access and logging in
- Where to store your files
- Loading software with modules
- Running jobs with Slurm
Throughout this page, replace USERNAME with your Purdue career account username and CLUSTER with the name of the cluster you are using (for example, negishi or gautschi).
What is a cluster?
A cluster is a collection of many interconnected computers, called nodes, that share one or more storage systems. Clusters typically run a UNIX-like operating system (Linux) and are managed by a batch scheduler.
Each node is a computer with one or more CPU sockets, each made of many cores, plus memory. Some nodes also have GPUs or extra memory.

A cluster is split into two kinds of nodes:
- Login (front-end) nodes: where you land when you log in. Use them to edit files, transfer data, and submit jobs.
- Compute (back-end) nodes: where your research actually runs. You reach them by asking the scheduler for resources.

Don't compute on the login nodes
Login nodes are shared by everyone on the cluster and have limited resources. Run anything computationally expensive as a job on the compute nodes.
You can tell which kind of node you are on from your command prompt, or with the hostname command:
Which cluster should I use?
| Cluster | Best for | Notes |
|---|---|---|
| Negishi | General-purpose CPU and MPI workloads | Community cluster |
| Gautschi | AI and mixed CPU + GPU workloads | Community cluster with NVIDIA H100 and L40S GPUs |
| Gilbreth | GPU-intensive computing and machine learning | Community cluster; jobs must request GPUs |
| Scholar | Teaching and training | Not for production research |
| Anvil | Large-scale national research | Access through NSF ACCESS allocations |
See Purdue Clusters for more detail.
Logging in
Checking your access
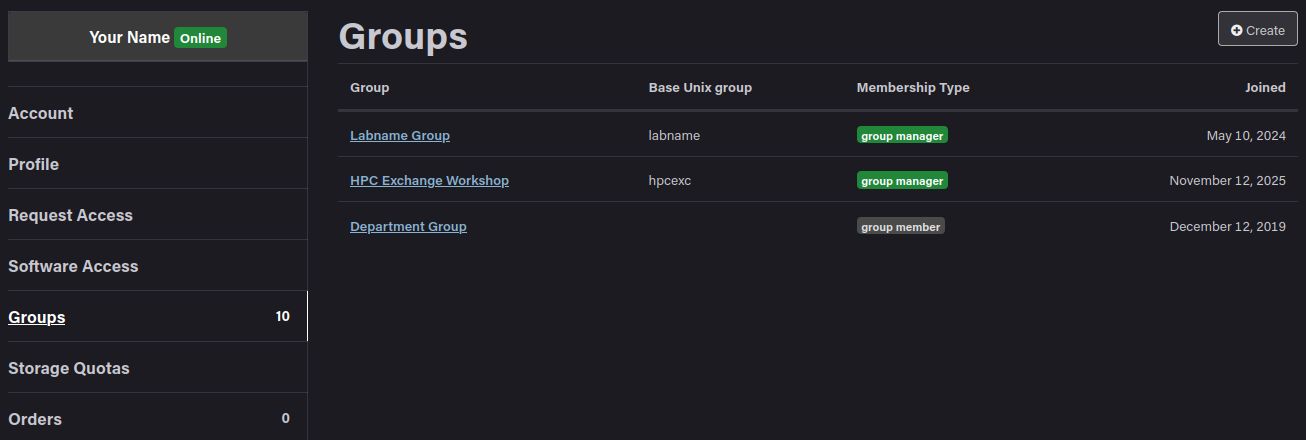
You can only log in to a cluster if you belong to a group (usually purchased by a lab's PI) that has access to it. Your lab's group managers (typically the PI or a delegate) add you to these groups.
To see which groups you belong to, sign in to your RCAC account page and open the Groups tab. Group managers can add and remove members from this page.
Connecting
There are three ways to connect to a cluster:
SSH gives you a command-line shell on a login node. Linux, macOS, and Windows all include ssh; open a terminal and run:
Enter your Purdue password when prompted (nothing appears as you type, which is normal), then approve the 2FA push on your phone. Once logged in, your prompt changes to something like:
ThinLinc gives you a full Linux desktop on a login node, which is useful for graphical applications such as MATLAB. Sessions are persistent, so your windows stay open if you disconnect.
- Browser: go to
https://desktop.CLUSTER.rcac.purdue.edu. - Desktop client: download it from Cendio and use
desktop.CLUSTER.rcac.purdue.eduas the server. The desktop client also supports SSH keys and restarting your session.

Open OnDemand (also called the Gateway) is a web portal to the cluster. From it you can browse and edit files, open a shell, and launch interactive apps such as Jupyter, RStudio, or a remote desktop.
Go to https://gateway.CLUSTER.rcac.purdue.edu and sign in with Purdue single sign-on. To open a shell, choose Clusters → >_CLUSTER Shell Access from the top menu.

See Cluster Access for more detail.
File storage
Most filesystems are shared across all nodes in a cluster, so a file you create on a login node is also available to your jobs on the compute nodes.

Where to put your files
Path: /home/USERNAME (also $HOME or ~)
- Small (25 GB), private to you, and backed up with snapshots.
- Specific to each cluster (not shared between clusters).
- Good for configuration files, scripts, small software installs, and small data.
- Not suitable for heavy I/O.
Path: /scratch/CLUSTER/USERNAME (also $CLUSTER_SCRATCH)
- Very large (100+ TB) and fast, but limited in number of files (about 2 million).
- Not backed up, and regularly purged. Files not accessed for 60 days are staged for deletion.
- Good for job input and output and other data-intensive work.
- Not for the only copy of anything important.
Run purgelist to see which of your scratch files are staged to be purged.
Path: /depot/LABNAME
- Group storage owned by your PI and shared with your lab, backed up with snapshots.
- Mounted on all community clusters, so you see the same files everywhere.
- Good for shared software, scripts, and important research data.
- Not suitable for intensive I/O. Stage heavy job I/O through scratch instead.
Path: /tmp
- Local to each node, not shared, and cleared when your job ends.
- Rarely needed. Use scratch unless you know you need node-local storage.
Check your usage and limits on each space with myquota:
$ myquota
Type       Location             Size    Limit    Use   Files   Limit    Use
===========================================================================
home       USERNAME           18.0GB   25.0GB  72.0%      -       -      -
scratch    USERNAME          670.8MB  200.0TB   0.0%  170.4K    2.0M   8.5%
depot      LABNAME             4.0MB  100.0GB   0.0%      -       -      -
Transferring files
Use the Files tab in Open OnDemand to upload and download files in your browser. This works well for small files, but large uploads or unreliable connections can fail.

For large transfers, use the Globus transfer service. Globus manages the transfer for you and resumes automatically if the connection drops. To transfer to or from your own computer, install Globus Connect Personal.

scp is a command line tool useful for copying files between computers through an SSH connection. Run these from a terminal on your own computer:
rsync is best for whole directories and for resuming interrupted transfers. Run these from a terminal on your own computer:
See File Storage and Transfer and Week 4: Storage & Transfers for more detail.
Software modules
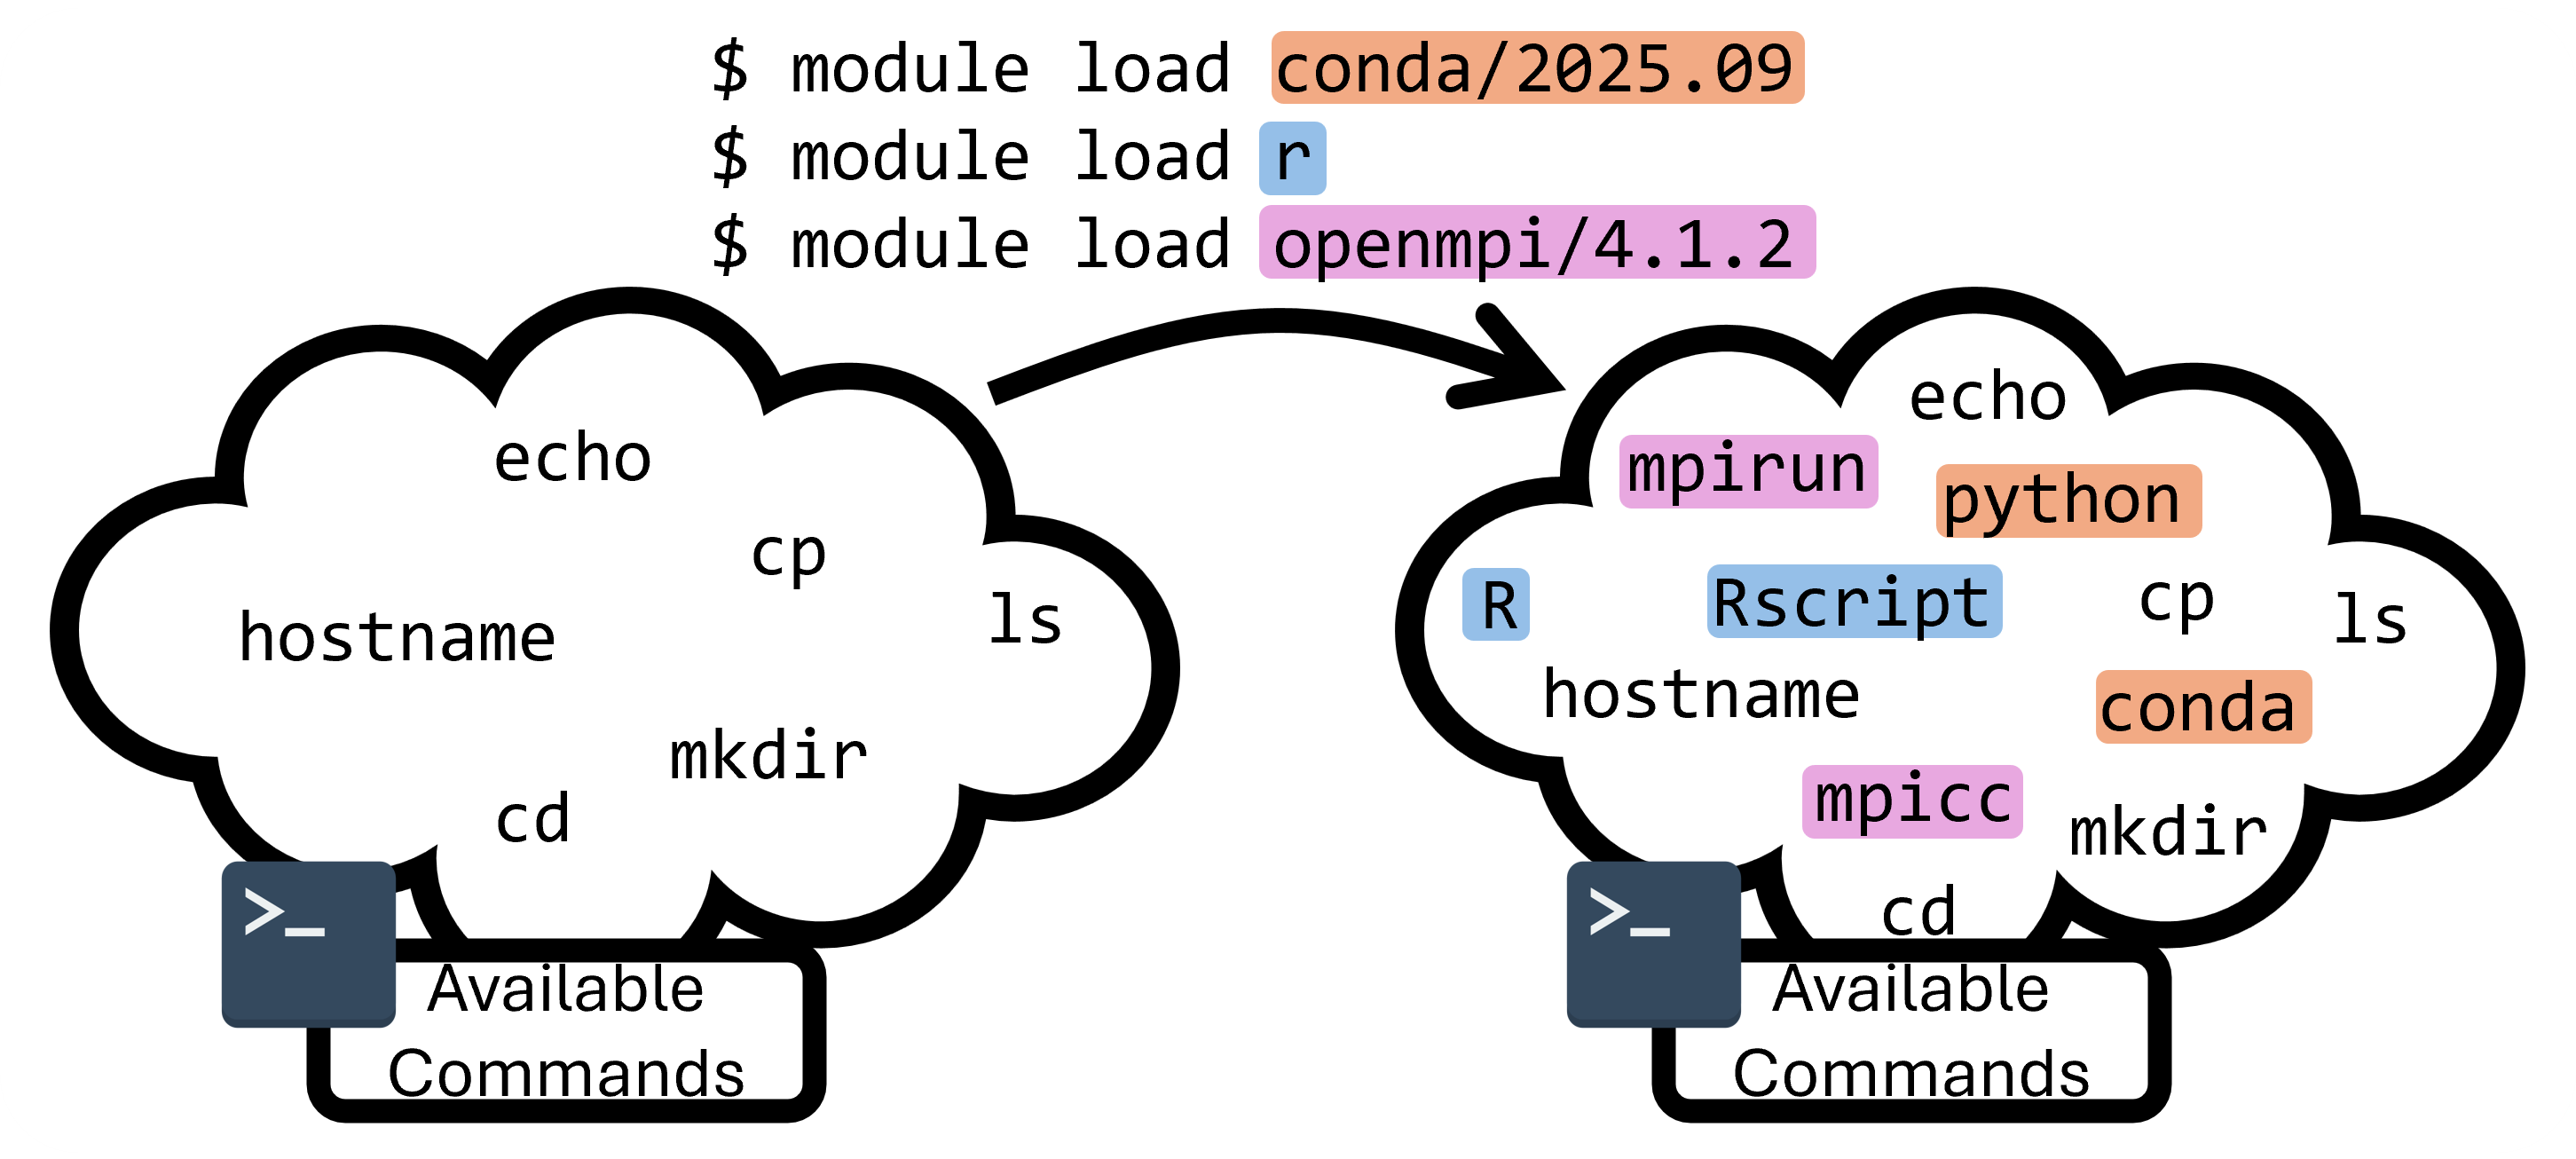
Clusters have many applications (often several versions of each application) preinstalled for users. However, it's not possible to have all applications available by default, as many applicactions and packages would conflict if installed together. To get around this, RCAC uses the Lmod module system so you can load only the software you need into your shell.
| Command | Description |
|---|---|
module avail |
List modules available to load |
module spider NAME |
Search all modules, including ones that need other modules loaded first |
module load NAME |
Load a module (optionally a specific version, NAME/VERSION) |
module list |
Show currently loaded modules |
module unload NAME |
Unload a module |
module purge |
Unload all modules |
For example, Python is provided by the conda module:
$ python --version
-bash: python: command not found

$ module load conda
$ which python
/apps/external/apps/conda/2024.09/bin/python
Installing your own Python packages
To install packages without sudo (admin) privileges, create your own conda environment:
See Cluster Applications and the software catalog for more detail.
Job submission
Compute nodes are shared by many users, so you don't log in to them directly. Instead, you ask the Slurm scheduler for resources, and Slurm runs your work when they become available.

Telling Slurm what you need
Every job tells Slurm which account to charge, where to run, and what resources it needs:
The account is the group allocation your job is charged to, usually your lab's. Run slist to see the accounts you can use and how many of their cores are free:
A partition is a set of nodes with similar hardware, such as CPU-only, high-memory, or GPU nodes. Run showpartitions to list them:
$ showpartitions
Partition       #Nodes     #CPU_cores  Cores_pending   Job_Nodes MaxJobTime Cores Mem/Node
Name  State   Total  Idle  Total   Idle Resorc  Other   Min   Max  Day-hr:mn /node     (GB)
cpu      up     446     0  57088   2078      0  15973     1 infin   infinite   128     257
highmem  up       6     0    768    236      0   2114     1 infin   infinite   128    1031
gpu      up       5     3    160    132      0      0     1 infin   infinite    32     515
The quality of service (QoS) sets your job's priority:
normal: high priority and up to 2 weeks of run time, but uses your account's allocation.standby: doesn't use your allocation, but has low priority and a 4-hour limit.

Request the time, nodes, and cores your job needs:
--time: maximum run time (D-HH:MM:SS). Your job is stopped when it runs out.--nodes: number of nodes.--ntasks-per-node: number of tasks (cores) on each node.
Some clusters and partitions also require --mem for memory or --gpus-per-node for GPUs. Check your cluster's user guide.
Partitions and QoS vary by cluster
The examples on this page use Negishi. Partition names, QoS options, and required options differ between clusters, so check the user guide for your cluster.
Running jobs
A batch job runs a script without you watching it, so it keeps running after you log out. Write a job script with #SBATCH lines that describe what you need, followed by the commands to run:
| myjob.sh | |
|---|---|
Submit it with sbatch:
When it finishes, the output is in slurm-JOBID.out in the directory you submitted from:
An interactive job gives you a shell on a compute node, which is useful for testing and debugging. Use sinteractive with the same options as sbatch:
USERNAME@login03.negishi:[~] $ sinteractive -A mylab -p cpu -q normal -n 1 -t 00:30:00
salloc: Granted job allocation 19809515
salloc: Nodes a195 are ready for job
USERNAME@a195.negishi:[~] $
Your prompt changes from the login node (login03) to a compute node (a195). Type exit to end the job and return to the login node.
Open OnDemand interactive apps, such as Jupyter, RStudio, and the remote desktop, submit a job for you from a web form. From the Open OnDemand home page, choose the app from the Interactive Apps menu, fill in the account, partition, and time, and launch it.

Monitoring and cancelling jobs
| Command | Description |
|---|---|
squeue --me |
List your pending (PD) and running (R) jobs |
jobinfo JOBID |
Show details about a job |
scancel JOBID |
Cancel a job |
$ squeue --me
JOBID      USER     ACCOUNT      PART QOS     NAME       NODES TRES_PER_NODE   CPUS  TIME_LIMIT ST TIME
32209880   USERNAME mylab        cpu  normal  myjob.sh       1 N/A                1     1:00:00  R 0:09
See Cluster Job Submission for more detail.
Being a good cluster citizen
- Request only the resources you need.
- Don't run heavy computations on the login nodes.
- Use scratch, not home or depot, for I/O-heavy jobs.
- Don't submit thousands of tiny jobs; see Workload Management for better approaches.
- Cancel interactive sessions and apps you are no longer using.
Getting help
- Cluster user guides: Negishi, Gautschi, Gilbreth, Anvil
- Email: rcac-help@purdue.edu